Showing posts with label photo tutorial. Show all posts

Friday, October 23, 2015

The Perfect Fishtail Wrapped Bun Tutorial


The Perfect Fishtail Wrapped Bun Tutorial - The Daily Fashion and Beauty News


Happy TGIF Beautiful! 

It's been a few weeks since the last time we shared an a easy-to-follow photo hair tutorial, so we figured it was time to post a new one for you to try out this weekend. 

Today's fishtail wrapped bun tutorial has been provided by Melissa Cook, contributor at Latest-Hairstyles.com

According to Melissa,  "Fishtail braids continue to be all the rage right and this hairstyle features two of them. This fishtail wrapped updo is quick and easy once you get the braiding part down, and the perfect hairstyle to keep in your beauty repertoire. This look is both trendy and chic, and luckily it looks trickier than it actually is to create!"

Without further adieu, let's get into the tutorial. 


The Perfect Fishtail Wrapped Bun Tutorial

What You Need:


  • 2 alligator clips
  • 4 elastic bands
  • 1 donut bun
  • 3-6 hair pins
  • hairspray

Step 1
With a part on the right side, separate off a portion of hair from the part down to the left ear. Clip off the back portion of hair with an alligator clip.


Step 2
Pick up a section of hair near the part and begin a fishtail French braid. This is done by dividing the section into two halves and crossing small sections of hair underneath to the opposite side while incorporating hair into the braid each time.


Step 3
When all of the hair is brought into the braid, finish braiding the section down into a regular fishtail braid.


Step 4
Gently pull on the edges of the braid to loosen and create a fuller braid. Tie off the end with a clear elastic band.


Step 5
Repeat the previous steps creating another braid on the right side of the head.


Step 6
Let down the hair at the back and sweep it up into a low ponytail, tying it off with another elastic band.


Step 7
Take a hair donut and wrap it over the ponytail.


Step 8
Spread the hair around the donut and wrap another hair band over the top to secure it.


Step 9
Twist the hair sticking out from the donut and wrap it around the base of the bun.


Step 10
Pin down the ends with a hair pin.


Step 11
Pick up the braid from the right side of the head and wrap it over the top of the bun and around to the left side.


Step 12
Slide in some hair pins to secure the braid against the head.


Step 13
Now wrap the braid from the left side over the bun.


Step 14
Pin this braid down with another hair pin.


Step 15
Shower the style with hairspray and smooth down any flyaways.


Will you be giving this fishtail wrapped bun tutorial a try this weekend?  If you so, tag us so we can see and share your photos! 

Instagram: @latinflavadesigns

Twitter: @latncookndiva

Pinterest: @latinflavadesgn


Friday, June 28, 2013

Learn How To Fill In Your Eyebrows - Photo Tutorial

This photo tutorial is made possible by our sponsors at Starlooks

Your eyebrows are considered to be very important facial assets. Taking care of your eyebrows' appearance is a beauty essential. Having filled eyebrows makes your eyes and face beautiful in such a manner that when someone makes eye contact with you, he / she may say: "Wow! You have gorgeous eyes!" Receiving a compliment such as this one is only possible if you take the time to do something to make your face expressive and appealing, such as filling in your eyebrows.

To make yourself more beautiful and appealing than you already are, you will need to learn how to fill in your eyebrows. Here are few tips to help your eyebrows look full and perfect.

First, you will need to gather a few Eyebrow Essentials:

filling eyebrow essential tools


Now that you have all the necessary tools, let see exactly how easy it is to fill in your eyebrows the "non-complicated" way!:

brush eyebrows with spoolie


outline brows with brow pencil


outlined eyebrow


Taking the Starlooks Eyebrow Shader Compact - select the powder that matches your eyebrows the best. In my case, I am using the taupe shade.

starlooks eyebrow shader compact


fill in eyebrow with powder


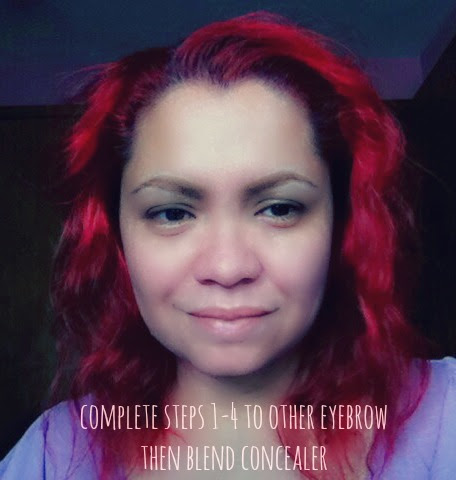
Once eyebrows are filled with brow powder, select a concealer that is slightly lighter or closer to your natural skin tone. I opted to use the second shade in this concealer palette.

elf concealer palette in light


line eyebrows with concealer


concealed eyebrows

Next and almost final step:

eyebrows completely filled

You can stop here once concealer has been completely blended or add two more steps to get a easy completed day look .....

Apply highlighter shade from the Starlooks Eyebrow Shader Compact under brow bone. Then use Starlooks Cream Blush to add warmth to cheeks.

starlooks cream blush


cream blush application

To complete this day look, apply a few coats of Starlooks Moisture Rich Lipstick to lips for a soft pouty finish.

starlooks moisture rich lipstick


completed final makeup look


To help you see the difference between naked eyebrows and properly filled eyebrows, here is a before and after:

before and after makeup look

As you can see, taking five minutes to fill in your eyebrows really helps soften and frame the face. My honest recommendation: Never, ever, ever leave home until you have filled in your eyebrows first!


I hope you were able to enjoy this super quick and easy photo tutorial. The Starlooks Eyebrow Shader Compact, the Cream Blush and Pigment Luster in Cinnamon Toss (not pictured in this tutorial) were included in the May 2013 Starlooks Starbox.

The Starlooks Moisture Rich Lipstick was not included in this particular Starbox - However I had to use it in this tutorial because it is the perfect creamy nude shade; and I just adore it!


Now it's YOUR turn: How do You prefer filling in Your eyebrows? With a powder or brow pencil? Let us know in the comments!


Disclosure: This beauty tutorial is sponsored by Starlooks. As an active partner, I receive their monthly Starbox and one additional makeup product every month to review. I do not receive compensation of any kind if You are inclined to click on a link and purchase their products. The links posted in this post are for Your reference only. All photos, opinions and posts are 100% mine and exclusive property of LatinFlava Designs. For a more detailed disclosure, please refer to our Disclosure Page listed in our Table of Contents at the top of this page. Thank you!