Thursday, December 31, 2015

Top 10 Beauty Tutorial Articles of 2015


Happy New Year's Eve!

Tuesday we posted a list of the top three DIY articles from this year and at the end of post we said that there would be a part deux. As promised, here it is.

This list roundup of 10 beauty tutorial articles will help you step-up your skincare routine, inspire you to recreate effortless hair styles and beautiful colored nail art designs. But, it doesn't stop there.

I've included two bonus articles to the list; although not considered to be tutorials, these two articles have some pretty good beauty information that I honestly believe you'll find helpful.

So, grab a snack + your favorite drink and let's get to reading.....

TOP 10 BEAUTY TUTORIAL ARTICLES OF 2015

Skin Care: 

How to Multi-Task Skin and Hair  -  a trend that hit home for many beauty/skincare geeks (myself included!).  Using different types of masks to treat different areas of the face doesn’t only make sense…but, it’s kind of genius. 

Beauty Guide: How to Apply Your SkinCare Products -  one of the most important steps to maintaining healthy youthful skin is by learning which order to apply your skincare products. You want to make sure you’re getting the most of them, right?  

Bonus: 
Ingredients to Look for in Your SkinCare Products -  not exactly a beauty tutorial article, but it still remains to hold a top spot as one of the most popular articles of 2015.  And for that I say: Thank you! 

Nail Tutorials: 

Red + Gold Ombre Nail Tutorial -  beautiful nail art to wear during the holidays due to the colors, however I’m positive that you’ll find a way to recreate this tutorial using any colors you wish. 

Pretty Yet Spooky: Easy Halloween Nail Tutorial -  although Halloween has passed, this tutorial can still be worn by pairing your favorite colored polish with a black one. 

Ombre Nail Tutorial -  round up your three favorite colored nail polishes and you’ll be able to create a sleek nail art look in no time. 

Hair Tutorials: 

The Ultimate Katniss Hair + Makeup Tutorial -  yes, you’ve probably seen the movie already (I did and was slightly disappointed. Why could’t she end up with Gayle?!) But now you can easily recreate Katniss’ hair + makeup anytime you’re feeling completely fearless. 

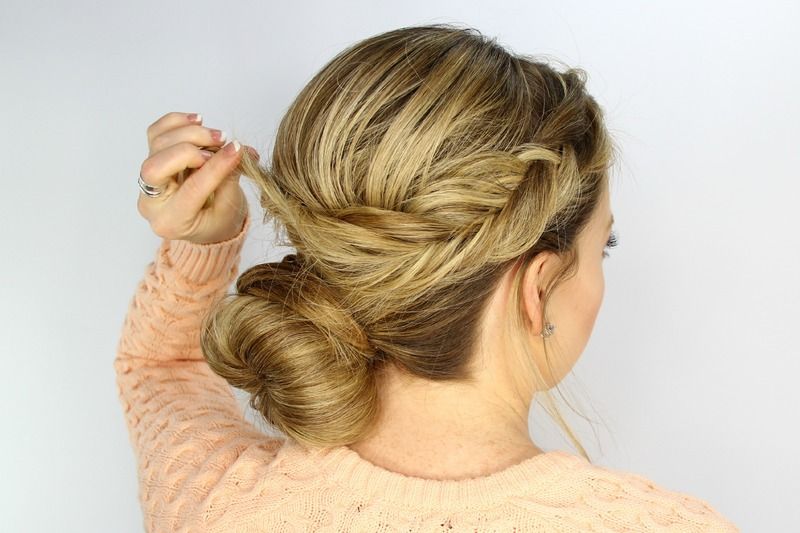
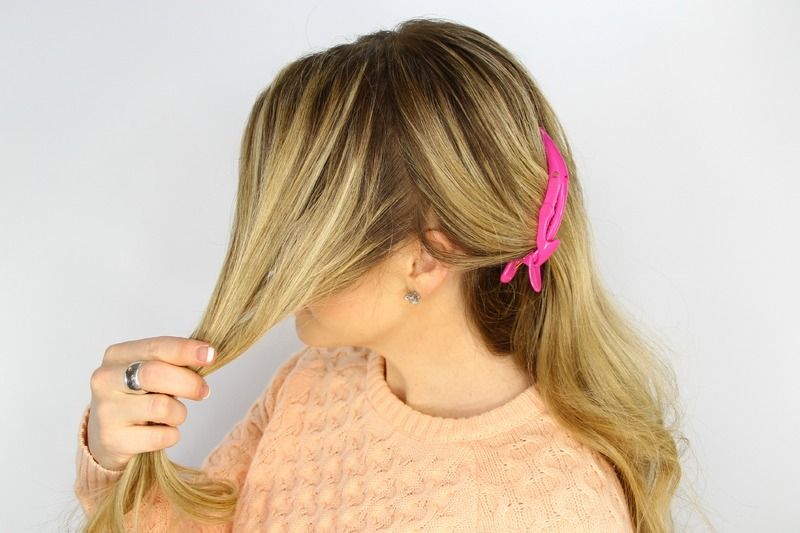
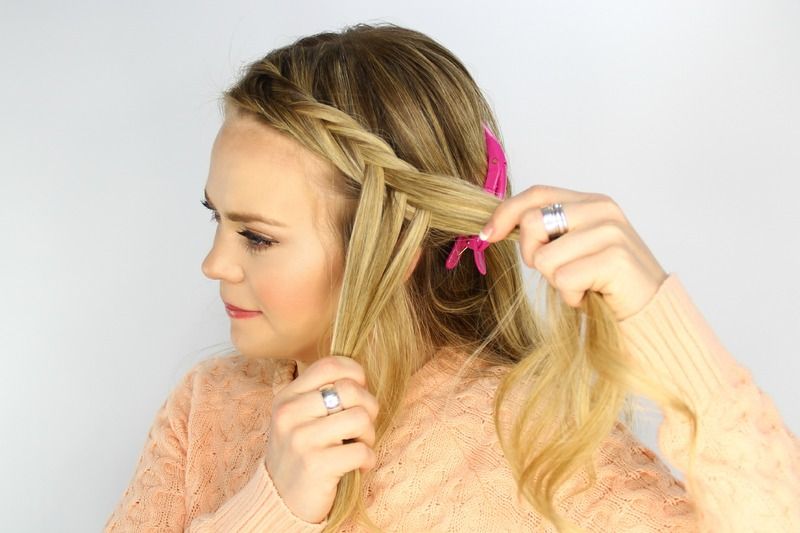
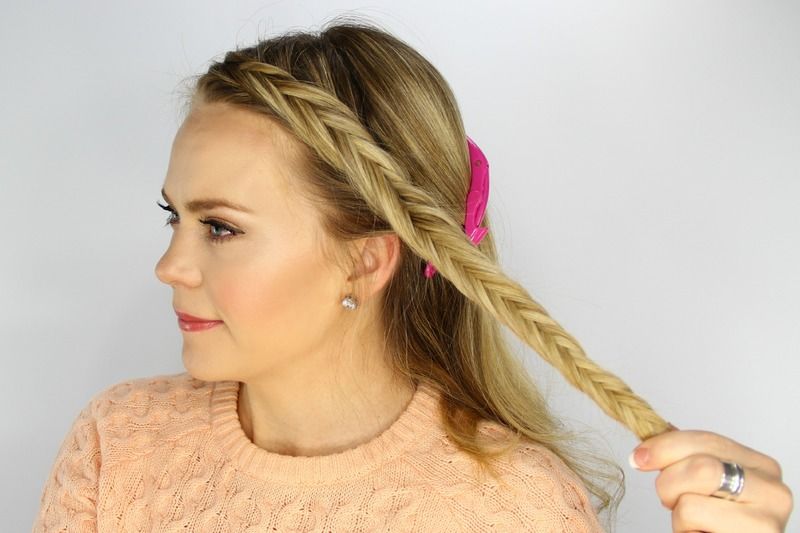
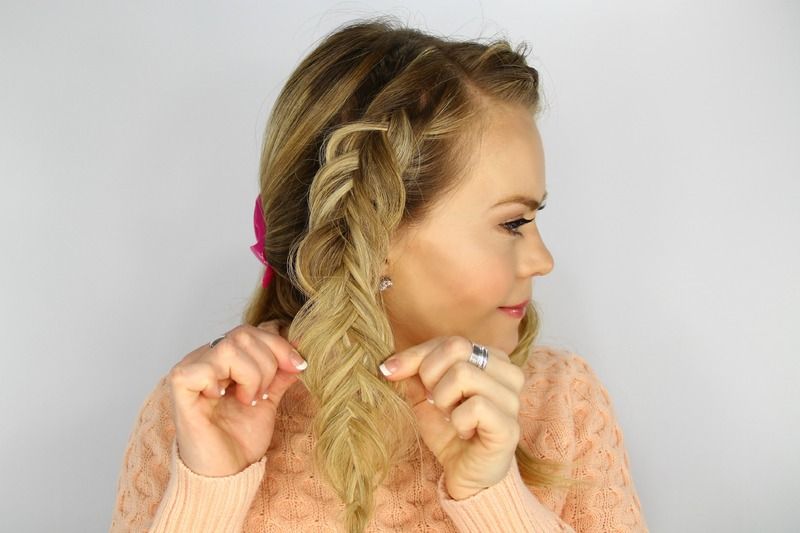
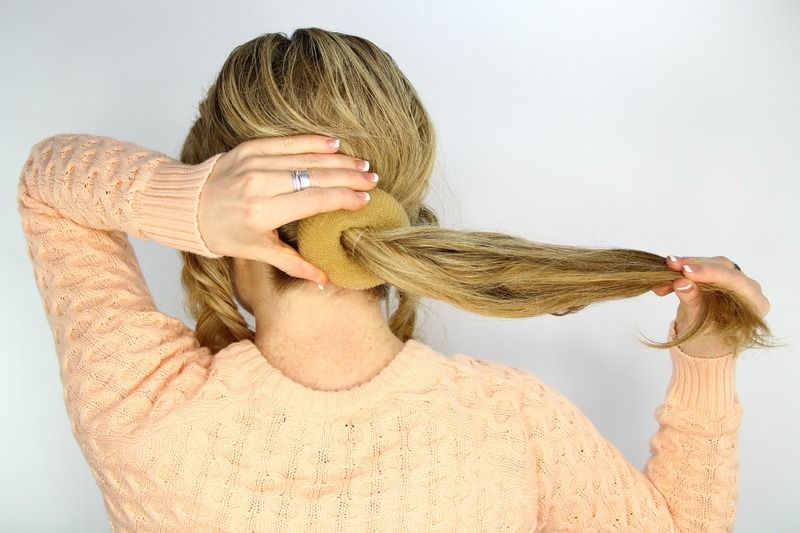
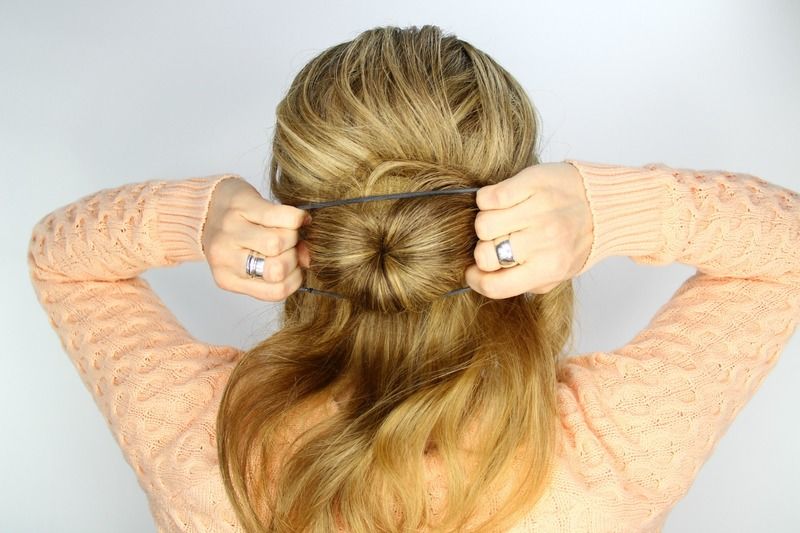
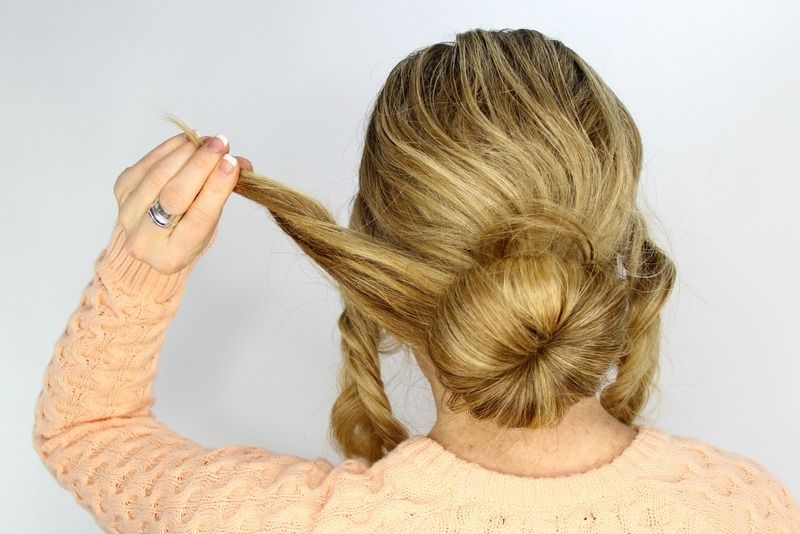
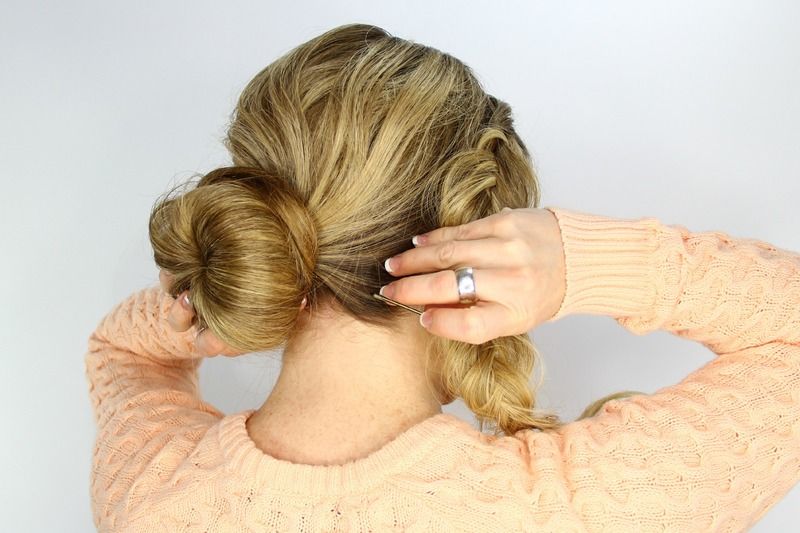
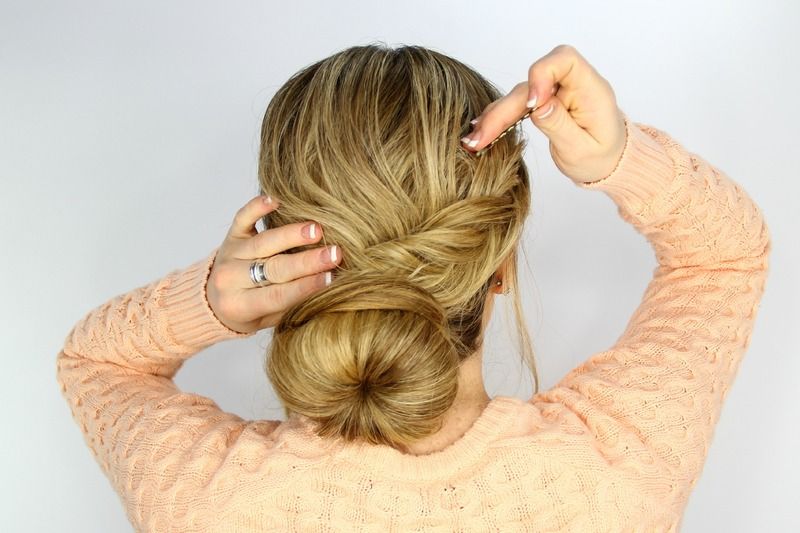
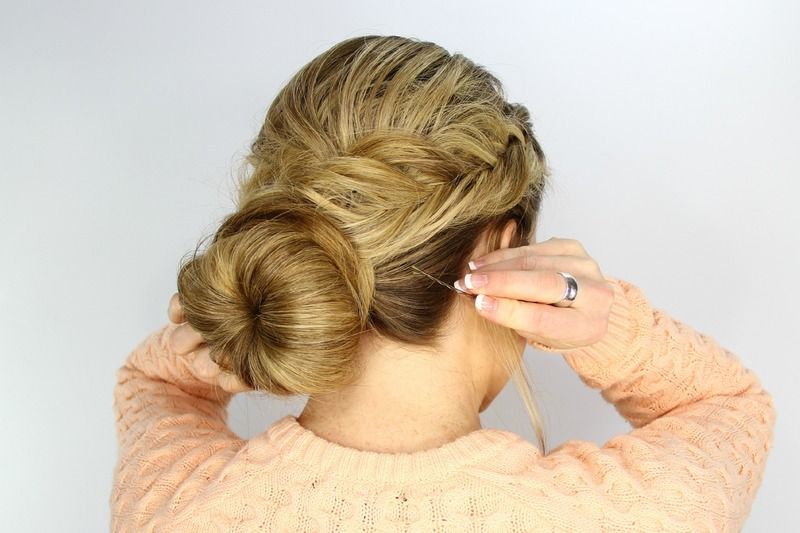
The Perfect Fishtail Wrapped Bun Tutorial -  it may seem like there are a lot of steps, but once you get the braiding done, this hair style comes together in almost an instant. 

Back to School: The Rosette Embellished Ponytail Tutorial -  this simple hair style is not just for those of you who will be going back to school next week but really, anyone who’s into the half bun look will definitely find this tutorial useful. 

The Easiest Knotted Undo Tutorial You’ll Ever Try -  looking for a new way to wear a low bun?  This knotted up-do should do the trick. 

Quick Guide: The Rodarte Inspired Messy Braid Photo Tutorial - a simple messy braid hair style in only seven steps?  Yes, please. 


Bonus: 

Ultimate Hair Tutorial: CW’s Jane the Virgin Female Characters -  if you’re a fan of this popular show, you’ll definitely enjoy these hair tutorials. Learn how achieve the styles worn by Jane, Petra, XO, and Rose during the show’s first season. 


I hope you find both top 10 article lists from this week to be helpful. I want to end today's article by thanking you for your support. I am extremely overwhelmed in gratitude for all the visits, reads and shares by you and everyone who takes the time to browse this blog. 

I would like to take this chance to invite you to subscribe to our VIP newsletter because there will be new articles, tips, lookbooks, eBooks and more coming to this blog during 2016 and I don't want you to miss any of it. 

So, until we speak again next year, I wish you + yours the warmest of wishes: May this new year bring lots of crazy happy soulful adventures, tons of laughter along with endless successful ventures.  

With love + gratitude, 
Mia 

Tuesday, December 29, 2015

The Top 3 DIY Beauty Recipe Articles from 2015


Hello Lovely!

A few weeks have passed since I last posted an article here on this blog - and for that I deeply apologize. As we all know, once the month of October ends, all hell breaks loose! With so many different activities to do in order to prepare for the Holidays, sometimes it feels as if there are not enough hours in the day to accomplish every task on our to-do list.

Regardless of how hectic our daily lives may become - Holidays or not -  it's always important to schedule in some "me time".  This solo time can be enjoyed during the weekends or mid-week, it really doesn't matter. What does matter is this: You need it and deserve it.

Now, when you start planning your special "me-time", please keep in mind that it doesn't need to cost you a fortune or take you all day to do.

So, in an honest effort to get you inspired,  I have put together a list of this blog's top 3 DIY beauty recipe articles from 2015.


THE TOP 3 DIY BEAUTY RECIPE ARTICLES FROM 2015:


Follow this simple six step DIY recipe tutorial to create beautiful flower bath bombs that will completely transform your next at home spa sesh. 


If your new year resolution involves a healthy round of detoxing, you may want to include these DIY hair treatments. Each recipe requires minimal ingredients and effort - my type of DIY’ing. 


Is your hair in need of nourishment and shine?  If so, this two ingredient DIY recipe is exactly what you need.  Plus, did I mention it involves using coconut oil + lavender?  Count us in.  


If you truly enjoy spending time creating DIY beauty recipes similar to these,  then I have exciting news for you.  Currently, we are working on a new e-Book that will contain close to 500 DIY beauty recipes for creating everything from bar soaps, bath salts, shampoo, hair treatments and more. 

This new DIY beauty recipe eBook is scheduled to arrive January 2016.  

To be among the first to purchase the eBook as soon as it is released, just add your name + email address to the list below. 

Email me when the DIY beauty eBook is released

* indicates required


Stay tuned for Thursday’s blog post, where we will be sharing the top ten beauty tutorial articles from 2015.

Thursday, November 19, 2015

The Ultimate Katniss Hair + Makeup Tutorial #MockingjayPart2


Happy Thursday Beautiful! 

Today's article is a two-for-one beauty tutorial dedicated to everyone who has been patiently waiting for the release of Mockingjay Part 2. 

I for one, am super excited to go and watch the movie this weekend. It's been a few months since the last time my husband and I have gone to the theater, so this weekend will be the perfect time to go. 

In honor of Mockingjay Part 2, Wendy Rose Gould (beauty expert for Latest-Hairstyles.com) has recreated the hair + makeup from the movie. 

So, if you were searching for hair and makeup inspiration for this weekend, look no further....everything you need to know continues below.  


The Ultimate Katniss Braid & Makeup Tutorial
[Just in Time for Mockingjay Part 2!]
Re-Create The Hair
"This is a relatively straightforward hairstyle. But to recreate the Katniss braid, you may want to get some hair extensions," explains Wendy Rose Gould, beauty expert for hair tutorial and advice site www.Latest-Hairstyles.com

"We’re using Effortless Exensions’ Sip On Hair, which is temporary and easy to work with. If you don’t need to add length, skip to step three."

Step 1: Apply Serum
Prep your hair by apply hair serum. This will tame frizz, make your hair easier to manage, and will also help create the same kind of shine that a lot of faux hair pieces have, thereby allowing it to blend a little easier. We’re using Cureology Smoothing Anti-Frizz Hair Serum.
Step 2: Apply Extensions
This step will vary depending on what kind of extensions you’re adding.
Step 3: Move Hair
Shift all your hair to one side of your head.
Step 4: Part Hair
Part your hair down the center.
Step 5: Fishtail Braid
Now for the most arduous part of this hair tutorial: creating your fishtail braid (and it’s not even difficult). To do this, divide your hair into two sections, then drag an outer piece of hair from one section over to the other section. Pull tight, then repeat on the opposite side. Continue pulling tight as your braid the length of your hair, securing with a clear elastic on the end. Make sure all your hair is draped to one side of your head (secure with bobby pins if necessary), and then pull out sections of hair for that “piece-y,” and lived in look. You can use a texturizer or more serum to get those strands. Also twist each of these pieces to keep them separated.

Re-Create The Makeup: 


"In three words, Katniss’ makeup is natural, dewy, and bronzed," says Wendy Rose Gould, beauty expert for hair tutorial and advice site www.Latest-Hairstyles.com.
To achieve this, I first applied Etude House Precious Mineral BB Cream to my skin. I then applied the bronzer in Paula Choice’s Blush it On Contour Palette with a bushy brush onto the apples of my cheeks. I also applied the bronzer to my forehead and chin, slowly building color. From the same palette and with the same brush, I added highlighter to the applies of my cheeks and the center of my forehead, then followed up with the darkest blush to add color onto my cheeks.
For my eyes, I used Urban Decay Naked Basics Palette. I filled in my brows with Faint, then applied Naked 2 across my eyelids. I used Faint in my eye creases to create dimension, and blended out with W.O.S. The colors you choose for this eye look will depend on my coloring. In general, stick with a matte brown that’s darker than your skin for the eyelids, followed by a slightly darker brown in the creases. The blending color should match the color of your skin.
I also applied tre’StiQue’s Swiss Chocolate Line, Sharpen & Smudge Eye Pencil to my upper lash line and blended with an angled eyeliner brush, then threw on some Sigma Sinuosity mascara. For lips, I dabbed on a pinkish nude lacquer and blended it into my lips with my pinky.

If you like, watch the video tutorial HERE

Are you excited to see #MockingjayPart2 tomorrow? Will you be recreating Katniss' hair and makeup?  If you do, please tag us on your photos so we can share them too! 
Instagram: @latinflavadesigns
Twitter: @latncookndiva

Friday, November 13, 2015

Red + Gold Ombre Nail Tutorial

Hello there Gorgeous! 

Can you believe that the month of November is almost over?  I can't. It's crazy how quickly the days go by once Halloween is over. But, there is a silver lining: the Holidays are right around the corner. 

And that's something we all look forward to, amiright? 

So, if you’re starting to feel the holiday vibes, then you’ll want to check out this new nail art tutorial from our close friends at Julep. 

Recently, they shared a gold-and-red ombre nail look that will bump up those festive feelings and get you ready for Turkey Day and beyond.  Best part about it is that this ombre tutorial is so easy, you don’t have to be a nail artist to create this shimmery look.

To begin, this is what you'll need to accomplish these beautiful red + gold ombre nails. 


This nail tutorial uses two polish shades from Julep's new Jingle Bells Welcome Box – which you can get for FREE when you join the Julep beauty box subscription. Once you join, you’ll get a box of on-trend, gorgeous, and good-for-you products delivered to your doorstep every month.  On the other hand, if you’re already a Maven (like I am!), you can snag these colors in Julep's  Very Merry Polish Duo gift set.

Now it's time to get into this easy Red + Gold Ombre Nail Tutorial. 


Red + Gold Ombre Nail Tutorial - The Daily Fashion and Beauty News


To get started, pick a gold and a sparkly red polish (they are using Margot Bombshell and Neely from the Jingle Bells box) and follow these simple steps:

1) Paint one coat of Gold, then let dry completely.
2) Dab a makeup sponge with the red glitter polish
3) Blot the makeup sponge on the tip of the nail to create the ombre effect.

Then, add the top coat, and you’re done!

These red + gold ombre nails are perfect for the upcoming Holidays. You can wear these nails for Thanksgiving dinner or for Christmas - while opening your gifts ;) 

For those of you who may not be all about red and gold, here is another similar ombre nail tutorial we shared a few weeks ago: Galaxy Inspired Ombre Nail Tutorial 


Hopefully this easy to follow ombre nail tutorial inspires you to treat yourself to a little glam this weekend. If you enjoy reading nail tutorials + nail related articles, I invite you to sign up for our weekly newsletter where we promise to only share good stuff with you once a week (typically on Friday evening). 


Subscribe to The Daily weekly newsletter

* indicates required


PS. We are currently in the process of creating a few lifestyle (beauty + fashion + foodie) related eBooks within the next few weeks - if you're getting our newsletter, you'll be among the first to have vip access to each one! 

Friday, November 6, 2015

Hers + His Holiday Gift Guide 2015

A few exclusive fashion and beauty gift ideas for that special lady or man in your life hand picked from some of our top favorite online shopping sites.


Hers+His Holiday Gift Guide 2015 - The Daily Fashion and Beauty News

1. Tory Burch Brodie Pebbled Leather Bucket Bag at Neiman Marcus  2. Anastasia Beverly Hills Lustrous Lip Gloss Set exclusively at Macy's  3. Aurora Stripe Mug at Neiman Marcus   4. Tarte Home For The Holidaze Collectors Set at Macy's   5.  Need For Bead Sweatshirt at latinflavadesigns.com   6. Nordic Sunrise Journals (set of 3) at Anthropologie   7. Fresh Skincare Affair (limited edition) at Sephora  8. Anja Howlite Layered Necklace at latinflavadesigns.com   
9. Fujifilm INSTAX Mini 90 Brown Instant Film Camera at Amazon  10. Elizabeth and James Nirvana Black Gift Set (limited edition) at Sephora   11. Gold Luster Stemless Glasses (set of 4) at One Kings Lane   12. Cover Me Cozy Sweater at latinflavadesigns  13. KMB Suede High Tops at Anthropologie   14. Sephora Favorites Superstars at Sephora  15. Ethan Blanket Scarf at latinflavadesigns.com  


Hers+His Holiday Gift Guide 2015 - The Daily Fashion and Beauty News


1. Wine Aerobics Stemless Wine Glasses (set of 4) at One Kings Lane  2. The Art of Shaving - The 4 Elements of the Perfect Shave - Sandalwood at Sephora  3. Jonathan Adler 7 Days of Socks Box Set at Neiman Marcus  4. Amazon Echo at Amazon  5. Bluedio R+ Legend Bluetooth Headphones in Silver at Amazon  6. Sony Alpha a6000 MP Interchangeable Lens Camera + Accessories Kit at Amazon     7. Drake Two Tone Watch at latinflavadesigns  
8. Sephora Favorites The Leading Man Cologne Sampler (limited edition) at Sephora   
9. Shinola Journal Set with Leather Cover at Neiman Marcus   10. Foreo LUNA for Men Ultimate Grooming Collection with PRORASO (limited edition, available online only) at Sephora  11. Neronote Digital Gift Card at Neronote

Tuesday, November 3, 2015

What's In My Purse? - #BeHealthyForEveryPartOfLife

This shop has been compensated by Collective Bias, Inc. and its advertiser. All opinions are mine alone. #BeHealthyForEveryPartOfLife #CollectiveBias 


Hello My Lovelies! 

In today's article I'll be sharing what's in my purse on a daily basis. I've wanted to do a post like this for a while and now that I was given the opportunity to do so...I'm excited to get right into it! 

But, here's a sincere disclaimer: I carry way too many things with me. Although, everything that is in my purse helps me get through the day, there are times when I feel like I'm carrying around my entire office (which is partially true). 

However, I did manage to pick only my daily essentials. You know, those items that somehow always find their way into your bag no matter what?   

Yeah, those essentials. 


1. My iPad2 + keyboard:  I love having my iPad2 with me when I'm on the go. I use it to keep notes while I'm working with my local clients, create my shopping lists, and occasionally I will use it to write article drafts. 

2. Daily Planner: In order to get everything done, I have to write it down. Taking a pen to paper helps me to remember what errands I need to tackle and what appointments I have scheduled. It also makes it easier to schedule new clients I meet while I am out. 


3. Centrum VitaMints: I cannot even stress how crucial it is for me to take a daily vitamin. These New Centrum VitaMints are adult multivitamins with a refreshingly minty taste you can take/enjoy any time of the day with or without food or water. I always make sure to have them on hand since most mornings I  tend to forget to take them before leaving the house. Having them inside my purse - I can take them at anytime and anywhere. 


4. Emergen-C Immune+ Chewables: Two words: immune support. During the week, my days begin at 3:15 am when my cell phone alarm rings. During the first few hours of the morning, I am helping my husband get off to work on time and making sure that my daughter gets to her bus stop. These first few hours of my morning can be hectic. So, by the time I come back to the house to officially begin my day, I'm feeling somewhat lack-luster. That's when I reach into my purse and pull out this bottle of Emergen-C. These chewable tablets work every.single.time! 

5. Headphones: I like to pull these out when I'm at a coffee house or when I'm in the car waiting for my daughter to arrive at her bus stop.  There's nothing like taking a break while listening to some music or watching an episode of a favorite TV show that I may have missed the evening before


6. ChapStick Total Hydration: The last thing anyone wants is to walk around town speaking with people while having dry chapped lips. I cant live without my ChapStick. I lather it on in the car before pulling out of the driveway, after I eat, and before going to bed at night. The advanced nourishing formula with argan oil and avocado butter and rosehip oils soothes my lips keeping them soft and plump. 

7. Cellphone: This is a no-brainer. My cell phone never leave my side let alone my purse. (I think many of you can relate to me on this one!). 

8. Wallet: Another standard purse essential. I carry my driver's license, corporate cards, and shopping cards inside. 

9. Mini makeup bag: For the most part, I like to keep my everyday makeup very simple. I do, however always carry a few liquid lipsticks, a finishing powder, mini mascara, and a travel size makeup brush with me in the event I need to touch-up my makeup. 

10. A mini tripod: Having this tripod with me allows me to take photos with both my cell phone or camera at any given time. I use it to take outfit photos for my clients or just to practice taking photos with my camera. 

And...that's it. 

As you can see, I wasn't lying about carrying my entire office inside my purse. But, if you were to ask me which items I swear by, I would have to say the Centrum VitaMints, Emergen-C Immune+ Chewables and Chapstick Total Hydration are my "ride or die" purse essentials. 

If you haven't given these a try yet, you really should. You can find them in the Health&Beauty aisles of your local Walmart. 


Now that I've shared with you what's in my purse, I'm curious to see what your purse essentials are. 

Tell me: What do you carry in your purse?  Let me know in the comments or tag me on social media if you'd like to share a photo - I'd love to see + share them! 

Twitter: @latncookndiva
Instagram: @latinflavadesigns
Pinterest: @latinflavadesgn

Thursday, October 29, 2015

The Number One Tip to Managing SUI #MySizePoise

This shop has been compensated by Collective Bias, Inc. and its advertiser. All opinions are mine alone. You must be 21+ years old to try Poise Impressa Bladder Supports. #MySizePoise #CollectiveBias 


Today we're addressing an issue that can be a little TMI or personal, but learning a simple way to managing SUI (leaking brought on by laughing, coughing, sneezing or exercising) is something that has helped several of my close friends, including myself. 

I can recall the very first time this happened to me like it was yesterday. 


I was actually at the gym (of all places, right?) minding my own business, doing my normal walking routine on the treadmill while watching a video on my cell phone. 

At the end of the video, the vlogger inserted a few bloopers. Well, while watching these bloopers which were completely hilarious, I began giggling....and for some reason, my slight giggle turned into hard core LOL'ing - you know the type of laugh where you cover your mouth and begin to cry? Yeah, like that. 

Once I was able to compose myself, I walked off the treadmill like any normal person. But, when I reached down to grab my bag, I felt a little trickle of warmth. 

I went to the restroom to check myself and that's when I noticed that I had experienced some leaking. 

That first experience with SUI was roughly about two months ago. Since then, I have had a few other instances where this has happened. Although, my experience is one that can be considered as very mild, I know a few of my friends are not so lucky. 

Having leakage occur often while doing simple things like laughing, can really hinder your daily routine. I know this first hand because shortly after my first SUI mishap, I stopped going to the gym. I kept exercising (and watching funny videos) at home instead. 

But, the good news is now there is a way to managing SUI. 


Using Poise Impressa Bladder Supports 

Before explaining how to use these, let me stress this one point:

Poise Impressa Bladder Supports are meant to be used only if leak urine when you laugh, cough, sneeze, or during exercise. 

On the other hand, if you do leak urine when you feel the urge to urinate, these are not for you. Try using the Poise liners and pads for Urge Urinary Incontinence. 

Now that we have that covered, let's continue. 


Poise Impressa Bladder Support Kit comes with three different sizes. These sizes are not about your weight or the amount of leakage you experience - it's all about which one is the best internal fit for your body. 

Finding out which one will work best for you is very simple.


  • Start with size 1, insert the Bladder Support the same way you would a normal tampon. 
  • The non-absorbent Bladder Support once inside, will expand in order to support the uretha. 
  • This is important: If you still have leaks, then move up to size 2. Repeat (if necessary) until you've found the perfect fit. 
  • Lastly, to remove the support: pull on the string and dispose of it by placing it in the trash. 
Simple and discreet. 

Once you've discovered your perfect fit, you can then take a trip to your local Target to purchase them in a convenient 10 count pack in your perfect size. 


I know I'm not the only woman who has this issue - even if it doesn't happen often - which is why I decided to even share this tip to managing SUI. 

Knowing that I can wear a Poise Impressa Bladder Supports for up to 8 hrs without having to remove it if I need to use the restroom, I can now go to the gym, feeling completely secure and confident enough to get back on that treadmill, watch a funny video and laugh uncontrollably. 

Before I end this article, I wanted to tell you that Poise Impressa has a Rewards Program. To participate, after purchasing a Poise Impressa Sizing Kit at your local Target, visit www.MySizePoise.com - share your experience using Impressa and you'll receive a $25 promo code to cloud9living.com 


After reading this article, if you still have questions, please visit the Poise website for additional resources and testimonials from women like us who have used Poise Impressa Bladder supports. 


Have you ever experienced leakage when you laugh, cough, sneeze or exercise? 

Tuesday, October 27, 2015

Top 10 Amazing Dark Lipsticks for Fall

Top 10 Amazing Dark Lipsticks for Fall - The Daily Fashion and Beauty News


As the temps continue to take a dive from warm to cold, there is one thing we will be wearing this Fall: a dark lipstick. 

True enough: these 10 amazing dark lipsticks will not keep us warm, but they will add a touch of glamour to every outfit we do wear. 


In exact order shown in slideshow, here are our top 10 amazing dark lipsticks for Fall: 

1. Anastasia Beverly Hills Liquid Lipstick in Midnight 
2. Anastasia Beverly Hills Liquid Lipstick in Potion
3. Urban Decay Matte Revolution Lipstick in Afterdark
4. Sephora Collection Oil Infusion Color & Care in Fresh Berries
5. Maybelline New York ColorBlur by LipStudio in Plum, Please
6. Revlon Super Lustrous Lipstick in Spicy Cinnamon
7. Revlon Super Lustrous Lipstick in Black Cherry
8. M.A.C Satin Lipstick in Cyber
9. M.A.C Matte Lipstick in Instigator 
10. Wet n Wild MegaLast Lip Color in Vamp It Up


Do you have any of these dark lipsticks in your makeup collection?  Are there any other lipsticks you'd add to this list?  

Friday, October 23, 2015

The Perfect Fishtail Wrapped Bun Tutorial


The Perfect Fishtail Wrapped Bun Tutorial - The Daily Fashion and Beauty News


Happy TGIF Beautiful! 

It's been a few weeks since the last time we shared an a easy-to-follow photo hair tutorial, so we figured it was time to post a new one for you to try out this weekend. 

Today's fishtail wrapped bun tutorial has been provided by Melissa Cook, contributor at Latest-Hairstyles.com

According to Melissa,  "Fishtail braids continue to be all the rage right and this hairstyle features two of them. This fishtail wrapped updo is quick and easy once you get the braiding part down, and the perfect hairstyle to keep in your beauty repertoire. This look is both trendy and chic, and luckily it looks trickier than it actually is to create!"

Without further adieu, let's get into the tutorial. 


The Perfect Fishtail Wrapped Bun Tutorial

What You Need:


  • 2 alligator clips
  • 4 elastic bands
  • 1 donut bun
  • 3-6 hair pins
  • hairspray

Step 1
With a part on the right side, separate off a portion of hair from the part down to the left ear. Clip off the back portion of hair with an alligator clip.


Step 2
Pick up a section of hair near the part and begin a fishtail French braid. This is done by dividing the section into two halves and crossing small sections of hair underneath to the opposite side while incorporating hair into the braid each time.


Step 3
When all of the hair is brought into the braid, finish braiding the section down into a regular fishtail braid.


Step 4
Gently pull on the edges of the braid to loosen and create a fuller braid. Tie off the end with a clear elastic band.


Step 5
Repeat the previous steps creating another braid on the right side of the head.


Step 6
Let down the hair at the back and sweep it up into a low ponytail, tying it off with another elastic band.


Step 7
Take a hair donut and wrap it over the ponytail.


Step 8
Spread the hair around the donut and wrap another hair band over the top to secure it.


Step 9
Twist the hair sticking out from the donut and wrap it around the base of the bun.


Step 10
Pin down the ends with a hair pin.


Step 11
Pick up the braid from the right side of the head and wrap it over the top of the bun and around to the left side.


Step 12
Slide in some hair pins to secure the braid against the head.


Step 13
Now wrap the braid from the left side over the bun.


Step 14
Pin this braid down with another hair pin.


Step 15
Shower the style with hairspray and smooth down any flyaways.


Will you be giving this fishtail wrapped bun tutorial a try this weekend?  If you so, tag us so we can see and share your photos! 

Instagram: @latinflavadesigns

Twitter: @latncookndiva

Pinterest: @latinflavadesgn