Showing posts with label beauty. Show all posts

Monday, February 22, 2016

Hair Tutorials: 7 Incredibly Chic Ways to Wear Bobby Pins

Hair Tutorials: 7 Incredibly Chic Ways to Wear Bobby Pins


Hair Tutorials: 7 Incredibly Chic Ways to Wear Bobby Pins - The Daily Fashion and Beauty News


Happy Monday Gorgeous! 

It's the beginning of a new week and what better way to get it started then by having seven different hair tutorials?  

Thanks to Latest-Hairstyles.com and Wendy Rose Gould, today's hair tutorial post will definitely come in handy this week when you find yourself lacking a little hairstyle inspo. 

According to Wendy, "Bobby pins sort of get the short end of the stick. I mean, they’re super utilitarian, obviously, but pretty much every single tutorial out there tells you they should be tucked away, hidden from the world and never to be seen by a single soul."

"Of course, there’s a time and place when you don’t want your bobby pins to show, but today we’re here to set the bobby pin free. We came up with some bobby pin inspiration for you and have given a how-to for each. If you’re feeling even more playful, try using brightly colored or metallic bobby pins as you experiment with these incredibly chic ways to wear bobby pins."

#1 The Half-Up Bobby Pin Nest


How To: After teasing your hair at the crown and gently combing it out, pull back half of your hair to create a half-up hairdo. Instead of securing hair with an elastic, though, twist it twice to the right and then begin inserting bobby pins to secure. Don’t worry about being strategic or uniform or symmetrical. Instead, create a messy nest of bobby pins. Not only will your hair be very secure, but it’ll look cool. The more bobby pins and the more haphazard their placement, the more “on purpose” it will look.

#2 The Half Up Braided and Bobbied


How To: Create two small-to-medium braids on either side of your head. Pull them to the back until they meet and then insert four criss-crossed bobby pins. For an additional touch, and so people know you’re not ashamed of your bobby pin game, insert three horizontal bobby pins above the braids at the center of your head.

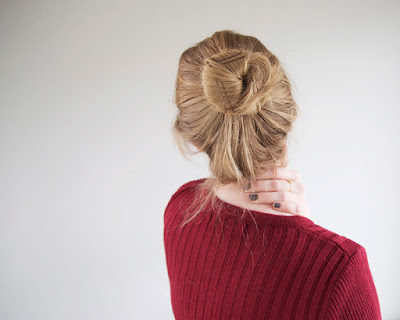
#3 The Messy Bun Meets Bobby


How To: Gather your hair near the crown of your head as if you’re going to put it in a messy ponytail. Begin wrapping it around itself, then secure the entire bun with a clear elastic. Keep your bun very loose, very casual and very undone. From there, add three sets of two bobby pins around the bun.

#4 The No Reason Zigzag


How To: This one’s great because the bobby pins serve no purpose other than to look pretty. Just above your ear, insert two diagonal bobby pins. From there, create a zigzag by adding two additional bobby pins on top and then two below.

#5 The Super Side Swept Lattice


How To: Create a very deep side part, pulling a large portion of your hair to one side of your face. Insert two bobby pins point away from your face. From there, fold over a small section of the pulled aside hair and insert two addition bobby pins (this time toward your face) to keep the fold in place. Repeat, this time pulling hair from the front portion of your pulled aside hair and folding it over. Insert two more bobby pins to keep it in place, again with bobby pins pointing away from your face. Repeat once more on the other side of the pulled aside section, bobby pins pointing toward your face again. Don’t get too caught up in making this look perfect or the same as the image featured here. Just keep folding sections of the hair back and forth and securing with alternating bobby pins to create a lattice.

#6 The Covered Pony


How To: Divide your hair into three sections, with the largest section in the middle and two smaller sections on either side. Gather the middle section into a low ponytail and secure with a clear elastic. Drag one section of hair over the top of the ponytail and wrap it around, securing with a bobby pin. Repeat on the other side. On either both sides or one side (your choice), insert four fanned out bobby pins.

#7 The Pinned Rosette


How To: Gather a small section of your hair above your ear and gently twist the hair around itself to create a spiral. Place the rosette flat against your head and insert two criss-crossed bobby pins.


Now it's your turn: Which of these chic ways to wear bobby pins will you try to recreate this week?  Let me know in the comments - I'm looking forward to hearing from you! 

Monday, February 1, 2016

Valentine's Day DIY Nail Inspiration


VALENTINE’S DAY DIY NAIL INSPIRATION FROM JULEP

Hello Gorgeous! 

To celebrate February 1st, I wanted to post this DIY nail inspiration guide. These nail looks are super cute and will definitely help sweeten your week. With Valentine's Day two weeks away, now would be the perfect time to practice these sweet nail art designs. 

The nail designs below all use the same three Julep polishes and the Julep Plie Wand Creativity Kit. Save 20% off at Julep.com and score this nail art kit and any of these polishes with code LETSGET20. Remember to extend the life of your lovely new manicure with top coat!


Valentine's Day DIY Nail Inspiration - The Daily Fashion and Beauty News


1. Mini hearts: Use two coats of Florence, a classic camel crème polish. Let dry, then use a toothpick or the dotting tool in the Creativity Kit to make the heart with Shawn, a poppy pink polish. First make two dots, then add the bottom triangle of the heart.

2. Dots with Naked Nail: Start with a clear base coat. Create the naked naked look by cutting out a V-shape out of scotch tape and sticking it on your nail. Use Shawn, our poppy polish, to fill in around the nail around the tape. Let dry, then use the Creativity Kit dotting tool or a toothpick to make white dots using Brigitte.

3. French Stripes: Apply two coats of Brigitte, a white crème polish, to all nails and let dry. Then, using the striping tool in the Creativity Kit or a toothpick to add your stripes. I always use scotch tape to help make guidelines for my lines, or else they often get squiggly!

4. Heart Accent Nail: On four nails, use two coats of Shawn, a poppy crème polish. Apply two coats of Brigitte, a white crème polish, to your accent nail. Let dry. Then, with a tooth pick or Creativity Kit add the heart on white nail, starting with two dots and then filling in the rest of the heart.


Are you a polish lover? Then you should try the Julep beauty box! You can get a box of gorgeous and good-for-you beauty, skin, or nail products delivered to your door every month. Get your Valentine’s Day beauty box today, featuring the poppy polish used in these nail looks, for 50% off!  Use code XOXOXO to get 50% off your first box.


PS. Before sharing with DIY nail inspiration design you like the most, I wanted to let you in on a secret: Later this month we will be releasing our first beauty diy eBook. The eBook will have over 400+ beauty diy recipes that can be used during daily beauty routine or on special occasions. To be notified once the eBook is ready for purchase, fill out the form below. 

Sign Up to get our 1st beauty eBook

* indicates required


Tuesday, January 19, 2016

Sleeping Beauty Overnight Gel Masques

 Miss Spa Launches 5 “Sleeping Beauty” Overnight Gel Masques
Enjoy professional results while you sleep for a refreshed and renewed complexion 

Sleeping Beauty Overnight Gel Masques - The Daily Fashion and Beauty News


As someone who loves trying new skincare products - especially facial masks - finding that one product that will work on my skin with minimal effort on my part is essential.  Which is the main reason why I am all over the overnight gel masques / facial treatment masks beauty trend. 

Knowing that whichever overnight gel masque I apply is working its magic by sinking into the skin on a deeper level makes the added step to my nightly routine completely worth it. 

If you haven't tried sleeping with an overnight gel masque, I recommend you give it a try.  And, if you're thinking that an overnight skincare product like this will cost you a fortune, I'm happy to say that will not be the case. 

Miss Spa is proud to launch their new collection of 5 Overnight Gel Masques ($7.99 each) that deliver extraordinary benefits to the skin while sleeping. Before going to bed, spend only 1 minute to gently massage the liquid mask of your choice to cleaned skin until completely absorbed. As you wake in the morning, your skin will be repaired with no need to rinse.
The 5 masques include: Anti-Aging (smooths and refines fine lines and wrinkles), Soothing (calms sensitive and irritated skin), Radiance (brightens and evens out skin tone), Moisturizing (hydrates dry and dehydrated skin) and Purifying (exfoliated and deep cleanses skin). They are water-based and free of parabens, artificial dyes, talc, fragrance and NEVER tested on animals. The masques are packaged in an easy to open, re-sealable pouch that provides 3 applications each.


  • Anti-Aging - Counteract pesky signs of aging with Miss Spa Anti-Aging Overnight Gel Masque. Infused with Palmitoyl Tripeptide-5, it reduces mimic wrinkles by inhibiting muscle contractions and slow down cellular skin aging.
  • Soothing - Help relieve stressed, aggravated skin with Miss Spa Soothing Overnight Gel Masque. Infused with fruit and plant extracts of Blackcurrant and Cardiospermu, it effectively reduces inflammatory processes and replenishes the damaged skin barrier.
  • Radiance - Breathe new life into lackluster skin with Miss Spa Radiance Overnight Gel Masque. Infused with Oligopeptide-68, it decreases tyrosine oxidation and melanin synthesis to reduce overall skin pigmentation.
  • Moisturizing – Bathe skin in moisture with Miss Spa Moisturizing Overnight Gel Masque. Infused with Adenosine and Papaya, it optimizes the water balance and reduces the trans-epidermal water loss of the epidermis.
  • Purifying - Brighten and soften dull, rough skin with Miss Spa Exfoliating Purifying Overnight Gel Masque. Infused with Pineapple, it removes superficial dead skin cells and restores the skin’s natural radiance and complexion.
Cost: $7.99 each with approximately 3 applications each
Where to Buy: www.ulta.com 

Tip: Anytime I need to buy more of these Miss Spa gel masques (or any beauty related product in general), I only shop online through Ebates so I can get a percentage of my money back. I checked after writing this article and if you shop at Ulta through the Ebates site, you'll get 3% cash back. 


I honestly think you'll find these overnight gel masques from Miss Spa to be not only easy to use, but more importantly effective at locking in all their "good for your skin" ingredients allowing you to wake up to smooth and hydrated skin in the morning. 


Have you ever used an overnight gel masque / facial mask treatment? 
If so, which one is your favorite? 

Thursday, January 14, 2016

Quick Post Gym Hairstyles for Work + Fun


Quick Post Gym Hairstyles for Work and Fun - The Daily Fashion and Beauty News


Quick Post-Gym Hairstyles for Work & Fun
Date night, work or last minute plans? Go from the gym to glam with these fast hair ideas


In last week's article I shared a few simple ways you can create a successful personal fitness program, if you missed it - click here to read the full article. 

Of the many challenges that come from working out, one of the most popular is how to style our hair post-gym. Regardless of what time of day (or night) you choose to work out, the following hair ideas shared by Fernando Salas, creator of White Sands Haircare, will certainly give you fast hair ideas to go from the gym to a number of after workout plans like work, a date or even just a lazy weekend at home. 


1. Going from the Gym to Last Minute Plans - Do a 3 Minute Blowout
Spray a hairspray like White Sands Infinity ($22) to soak up extra oils and create lift at the roots. Quickly use your dryer and direct the heat only at your hairline to dry up the most visible, sweaty areas. Flip your head over and dry hair upside down. When you come back up, you will have volume while also refreshening tresses. Spray your brush with perfume and run through your hair to finish.

2. Going from the Gym to Date Night - Do a Post Workout Chignon
Start by tousling hair with a texture spray like White Sands UnderCover Styling Spray ($21). Loosely pull hair back into a low pony tail. Using bobby pins, pin a section of hair from the middle of the ponytail an inch or two above the hair tie. Then, use hair pins to pin the remaining lengths in place to complete the look. "Remember, it doesn't have to look perfect. The more creative and the more texture the better," explains Salas.

3. Going from the Gym to Work - Do a Classic Ponytail
"I've noticed that a beautiful classic ponytail is underutilized," says Salas. Using a light weight paste like White Sands Smudge Texture Crème ($16), smooth hair back into a shiny sleek, pony and secure in the middle of the head below the crown and above the nape. Wrap a small piece of hair around the band to dress it up and secure the ends with a bobby pin.

4. Going from the Gym to Cocktails with the Girls - Do a High Bun
There are so many different bun makers out there with various foam shapes to choose from. It has never been easier to make one in seconds. You can even cut the toe area off of a sock and roll the remaining part into a circular piece to use. In seconds you will have a clean polished style, that is still fun and flirty. Seal it with a shine spray like White Sands Porosity ($19.40) to disguise oily hair.

5. Going from the Gym to a Relaxed Weekend - Do a Braid
No matter where life takes you, opting for a braided hairstyle can be the easiest way to get pretty hair without a lot of prep. Wear your braid of choice while working out and let this style act as a curling iron. Once you are done at the gym, undo to reveal heatless waves perfect for a casual weekend. 


Which post gym hairstyle are you most likely to try? 

Thursday, December 31, 2015

Top 10 Beauty Tutorial Articles of 2015


Happy New Year's Eve!

Tuesday we posted a list of the top three DIY articles from this year and at the end of post we said that there would be a part deux. As promised, here it is.

This list roundup of 10 beauty tutorial articles will help you step-up your skincare routine, inspire you to recreate effortless hair styles and beautiful colored nail art designs. But, it doesn't stop there.

I've included two bonus articles to the list; although not considered to be tutorials, these two articles have some pretty good beauty information that I honestly believe you'll find helpful.

So, grab a snack + your favorite drink and let's get to reading.....

TOP 10 BEAUTY TUTORIAL ARTICLES OF 2015

Skin Care: 

How to Multi-Task Skin and Hair  -  a trend that hit home for many beauty/skincare geeks (myself included!).  Using different types of masks to treat different areas of the face doesn’t only make sense…but, it’s kind of genius. 

Beauty Guide: How to Apply Your SkinCare Products -  one of the most important steps to maintaining healthy youthful skin is by learning which order to apply your skincare products. You want to make sure you’re getting the most of them, right?  

Bonus: 
Ingredients to Look for in Your SkinCare Products -  not exactly a beauty tutorial article, but it still remains to hold a top spot as one of the most popular articles of 2015.  And for that I say: Thank you! 

Nail Tutorials: 

Red + Gold Ombre Nail Tutorial -  beautiful nail art to wear during the holidays due to the colors, however I’m positive that you’ll find a way to recreate this tutorial using any colors you wish. 

Pretty Yet Spooky: Easy Halloween Nail Tutorial -  although Halloween has passed, this tutorial can still be worn by pairing your favorite colored polish with a black one. 

Ombre Nail Tutorial -  round up your three favorite colored nail polishes and you’ll be able to create a sleek nail art look in no time. 

Hair Tutorials: 

The Ultimate Katniss Hair + Makeup Tutorial -  yes, you’ve probably seen the movie already (I did and was slightly disappointed. Why could’t she end up with Gayle?!) But now you can easily recreate Katniss’ hair + makeup anytime you’re feeling completely fearless. 

The Perfect Fishtail Wrapped Bun Tutorial -  it may seem like there are a lot of steps, but once you get the braiding done, this hair style comes together in almost an instant. 

Back to School: The Rosette Embellished Ponytail Tutorial -  this simple hair style is not just for those of you who will be going back to school next week but really, anyone who’s into the half bun look will definitely find this tutorial useful. 

The Easiest Knotted Undo Tutorial You’ll Ever Try -  looking for a new way to wear a low bun?  This knotted up-do should do the trick. 

Quick Guide: The Rodarte Inspired Messy Braid Photo Tutorial - a simple messy braid hair style in only seven steps?  Yes, please. 


Bonus: 

Ultimate Hair Tutorial: CW’s Jane the Virgin Female Characters -  if you’re a fan of this popular show, you’ll definitely enjoy these hair tutorials. Learn how achieve the styles worn by Jane, Petra, XO, and Rose during the show’s first season. 


I hope you find both top 10 article lists from this week to be helpful. I want to end today's article by thanking you for your support. I am extremely overwhelmed in gratitude for all the visits, reads and shares by you and everyone who takes the time to browse this blog. 

I would like to take this chance to invite you to subscribe to our VIP newsletter because there will be new articles, tips, lookbooks, eBooks and more coming to this blog during 2016 and I don't want you to miss any of it. 

So, until we speak again next year, I wish you + yours the warmest of wishes: May this new year bring lots of crazy happy soulful adventures, tons of laughter along with endless successful ventures.  

With love + gratitude, 
Mia 

Tuesday, December 29, 2015

The Top 3 DIY Beauty Recipe Articles from 2015


Hello Lovely!

A few weeks have passed since I last posted an article here on this blog - and for that I deeply apologize. As we all know, once the month of October ends, all hell breaks loose! With so many different activities to do in order to prepare for the Holidays, sometimes it feels as if there are not enough hours in the day to accomplish every task on our to-do list.

Regardless of how hectic our daily lives may become - Holidays or not -  it's always important to schedule in some "me time".  This solo time can be enjoyed during the weekends or mid-week, it really doesn't matter. What does matter is this: You need it and deserve it.

Now, when you start planning your special "me-time", please keep in mind that it doesn't need to cost you a fortune or take you all day to do.

So, in an honest effort to get you inspired,  I have put together a list of this blog's top 3 DIY beauty recipe articles from 2015.


THE TOP 3 DIY BEAUTY RECIPE ARTICLES FROM 2015:


Follow this simple six step DIY recipe tutorial to create beautiful flower bath bombs that will completely transform your next at home spa sesh. 


If your new year resolution involves a healthy round of detoxing, you may want to include these DIY hair treatments. Each recipe requires minimal ingredients and effort - my type of DIY’ing. 


Is your hair in need of nourishment and shine?  If so, this two ingredient DIY recipe is exactly what you need.  Plus, did I mention it involves using coconut oil + lavender?  Count us in.  


If you truly enjoy spending time creating DIY beauty recipes similar to these,  then I have exciting news for you.  Currently, we are working on a new e-Book that will contain close to 500 DIY beauty recipes for creating everything from bar soaps, bath salts, shampoo, hair treatments and more. 

This new DIY beauty recipe eBook is scheduled to arrive January 2016.  

To be among the first to purchase the eBook as soon as it is released, just add your name + email address to the list below. 

Email me when the DIY beauty eBook is released

* indicates required


Stay tuned for Thursday’s blog post, where we will be sharing the top ten beauty tutorial articles from 2015.

Friday, November 13, 2015

Red + Gold Ombre Nail Tutorial

Hello there Gorgeous! 

Can you believe that the month of November is almost over?  I can't. It's crazy how quickly the days go by once Halloween is over. But, there is a silver lining: the Holidays are right around the corner. 

And that's something we all look forward to, amiright? 

So, if you’re starting to feel the holiday vibes, then you’ll want to check out this new nail art tutorial from our close friends at Julep. 

Recently, they shared a gold-and-red ombre nail look that will bump up those festive feelings and get you ready for Turkey Day and beyond.  Best part about it is that this ombre tutorial is so easy, you don’t have to be a nail artist to create this shimmery look.

To begin, this is what you'll need to accomplish these beautiful red + gold ombre nails. 


This nail tutorial uses two polish shades from Julep's new Jingle Bells Welcome Box – which you can get for FREE when you join the Julep beauty box subscription. Once you join, you’ll get a box of on-trend, gorgeous, and good-for-you products delivered to your doorstep every month.  On the other hand, if you’re already a Maven (like I am!), you can snag these colors in Julep's  Very Merry Polish Duo gift set.

Now it's time to get into this easy Red + Gold Ombre Nail Tutorial. 


Red + Gold Ombre Nail Tutorial - The Daily Fashion and Beauty News


To get started, pick a gold and a sparkly red polish (they are using Margot Bombshell and Neely from the Jingle Bells box) and follow these simple steps:

1) Paint one coat of Gold, then let dry completely.
2) Dab a makeup sponge with the red glitter polish
3) Blot the makeup sponge on the tip of the nail to create the ombre effect.

Then, add the top coat, and you’re done!

These red + gold ombre nails are perfect for the upcoming Holidays. You can wear these nails for Thanksgiving dinner or for Christmas - while opening your gifts ;) 

For those of you who may not be all about red and gold, here is another similar ombre nail tutorial we shared a few weeks ago: Galaxy Inspired Ombre Nail Tutorial 


Hopefully this easy to follow ombre nail tutorial inspires you to treat yourself to a little glam this weekend. If you enjoy reading nail tutorials + nail related articles, I invite you to sign up for our weekly newsletter where we promise to only share good stuff with you once a week (typically on Friday evening). 


Subscribe to The Daily weekly newsletter

* indicates required


PS. We are currently in the process of creating a few lifestyle (beauty + fashion + foodie) related eBooks within the next few weeks - if you're getting our newsletter, you'll be among the first to have vip access to each one! 

Monday, October 19, 2015

Tips and Tricks for Everyday Eye Makeup + #FalsiesPushUpDrama

This shop has been compensated by Collective Bias and its advertiser. All opinions are mine alone.  #FalsiesPushUpDrama #CollectiveBias 


Tips and Tricks for Everyday Eye Makeup + #FalsiesPushUpDrama - The Daily Fashion and Beauty News


The eyes are the windows to the soul, as they say, and they are the most beautiful features in a woman's face.  Whenever you put on your eye makeup - especially mascara, your aim should always be to make your eyes look brighter.  

To achieve brighter eyes, you really only need one essential eye makeup product: Mascara. A volumizing mascara, like the Maybelline #FalsiesPushUpDrama , will lift your eyelashes - giving your eyes instant brightness. 

However, adding concealer, eye-shadow, kajal eyeliner, and an eyebrow kit will also help in creating an everyday eye makeup look to brighten the eyes. 

But, before showing you how to achieve the everyday eye look using the mentioned makeup products, let's do a little shopping. 

Personally, I prefer to use drug store makeup products for my everyday makeup. Why? They are easily accessible as well as budget friendly. 

On my most recent beauty run, I drove to Walmart to purchase a few of my favorite Maybelline products. 


While walking down the Maybelline aisle in the Cosmetics Dept, I noticed that there was a display for the new #FalsiesPushUpDrama mascara. Once I looked over the display and saw the waterproof version - I knew I wanted to buy it. 


Feeling completely accomplished, I walked over to the nearest cashier, paid for my beauty haul and drove home so I could do my everyday eye makeup. 


Here is my mini beauty haul: Maybelline Fit Me Concealer - 15 Fair, Color Tattoo - Creamy Beige, Mater Kajal - Midnight Brown, Brow Drama Pro Pallette - Blonde for eyebrows and the new Maybelline #FalsiesPushUpDrama Mascara in Blackest Black. 


Of all the drugstore beauty products, Maybelline knows a thing or two about mascara's. The new #FalsiePushUpDrama has a cup-shaped bristle that scoops, coats and lifts lashes. The plumping formula is creamy enough that it glides smoothly onto the lashes for a dramatic, volumizing  effect. Exactly what we need for brighter eyes!

Now that we have our five Maybelline products, let's move on to this easy step-by-step everyday eye makeup look. 


1. Using the spoolie inside the Browdrama Pro Palette, comb through your eyebrows. 

2. Taking one side of the double ended angle brush (also included with brow palette), dip into the wax. Apply the wax evenly over the entire eyebrow. 

TIP: Do your best to apply the smallest amount of wax. If you apply too much, the wax will clump and not allow you to get a smooth surface for the next step. 


3. Using the second side of the angle brush, pick up some of the powder. Position the angle brush directly under the eyebrow - in one smooth motion, line underneath the eyebrow. Do the exact same to the top of eyebrow.  Dipping the brush back into powder, begin to fill the sparse areas of your brow. Use the spoolie to blend the powder throughout the brow hairs. 

TIP: For the most natural brows, concentrate most of the powder from the middle to the tail. This will give you more definition. Try to have a lighter application to the front of brows. 


4. To define and highlight the brows, apply a light layer of concealer to the brow-bone. Dab concealer with fingers to blend it into the skin. 

TIP: Once you have highlighted your brow-bone, take a little more of concealer and use it over the entire lid as your eye-shadow primer. This also helps cancel out any skin discolorations, veins or circles under the eyes. 


5. Get a small synthetic blending brush. Pick up some of the highlight powder in the brow palette. Swipe this over the entire lid. 

6. After wiping off the blending brush, dip the brush into the cream eye-shadow. Place the eye-shadow on the lid, blending into the crease. This is will give you a soft wash of color over the eyes. 

TIP: For everyday eye looks, use Maybelline Color Tattoo in Creamy Beige, Matte Brown, Nude Pink and Pure Nude. 


7. Taking a small flat blending brush, pick up some of the cream eye-shadow then apply it to the lower lash line. Blend. 


8. Curl lashes. 
9. Open up your tube of Maybelline #FalsiesPushUpDrama, take the wand and place it at the bottom of the lash line. Glide the brush upward - gently moving it from side to side in a wiggling motion. 

TIP: When taking the mascara wand out of the tube, do not pump it in and out of the tube. This will ruin your mascara. Instead, twirl the wand inside the tube before pulling it completely out. 


9. (cont.) After applying mascara to the outer lashes, tilt the wand about 45 degrees and coat the inner lashes. 

After I applied the first layer of #FalsiesPumpUpDrama, you'll notice the lashes have gained volume and length.  This is a great result - especially after just one coat. 

But, there is a way to get even more volume out of this mascara. 

10. TRICK:  Using the spoolie from before, dip it into a little bit of translucent powder. Apply the powder onto lashes in the same exact way as we did our first layer of mascara. 
Follow up with a second coat of mascara.  - Do you see the added volumizing effect? What about the length? 

As you can see, with two coats of #FalsiesPumpUpDrama mascara + translucent powder you AH-mazing looking lashes. No need to mess with false lashes - especially for an everyday look. 

There is only one last trick left. Do you notice that sometimes there are these tiny little gaps in between your upper lashes? Let's fix that. 


11. With the tip of the masterkajal eye pencil, tight-line your upper lash-line. 

TIP: It may take a few times before you and your eyes get used to the feeling of the eye pencil on your upper waterline. I find that if I open up my eyes wide enough looking straight forward, I can run the eye pencil along my lash line with no problems. 

You've seen the steps, now take a look at this before + after photo: 


You can definitely see what a difference a little bit of eye makeup can do - especially a volumizing mascara. 


With that being said, even if you choose not to complete every single step, tip or trick from this tutorial, please go ahead and try out the Maybelline #FalsiesPushUpDrama mascara. Applying this mascara only takes a few minutes, but the dramatic results will last all day long. 

Do you have any tips or tricks for applying mascara? What's your favorite everyday eye makeup look?